My goal in this post is to stand up a Linux VM in Azure with
Eclipse connected to VSO that I can RDP into from Windows. To begin we will need to spin up the VM in
Azure. You can use either the current or
preview portal with either classic or resource manager deployment model. If you
decide to use the resource manager deployment model be sure and refer to this
post on how to enable a FQDN for your VM.
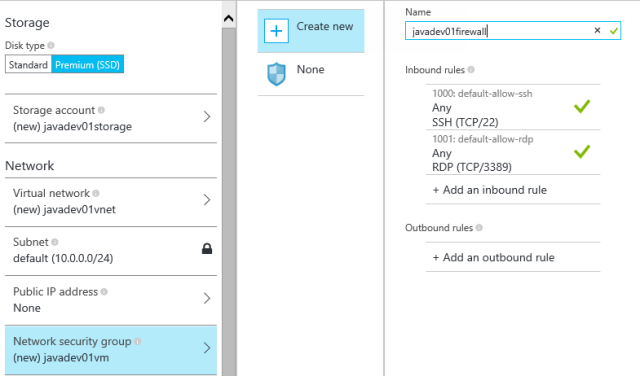
I am going to use an Ubuntu Server 15.04 machine for this post. During the creation I will open port 3389
which we will need for RDP.
Once the VM is running we are first going to connect to it
using Putty to install the required software. By default your image should already have git
installed so we can begin with xrdp and a desktop manager. To install xrdp so we can RDP into the machine
copy and paste these commands into your Putty session. Note whenever prompted type
Y and press Enter to continue with the installation.
sudo apt-get update
sudo apt-get install xrdp
Now we have to install a desktop manager so we have a UI to
rdp into. We are going to install xfce
because it works well with xrdp. To
install xfce and start the xrdp session copy and paste these commands into your
Putty session.
sudo apt-get install xfce4
sudo service xrdp start
At this point you could start a Remote Desktop Connection and
rdp into your machine. But before we do
we are going to install Eclipse and Firefox. Copy and paste the following
commands into your Putty session.
sudo apt-get install eclipse
sudo apt-get install libwebkitgtk-1.0-0
The first command will install Eclipse and all the required
Java components. The second command
makes sure we can open work items in Eclipse. Finally let’s add Firefox.
sudo apt-get install firefox
Now we can rdp into our new Java development machine using
Remote Desktop Connection.
When prompted by xrdp enter the username and password you used when you created the VM.
You can start
all the applications from the terminal but it is much more convenient to use
the Panel.

Right click the Panel and select Panel/Add New
Items…
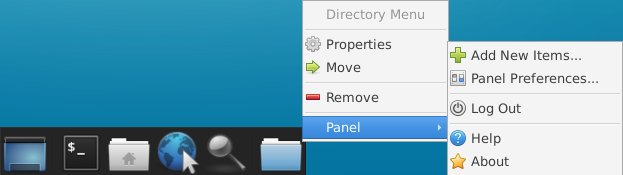
Select Launcher and click Add then Close
Right click the newly added area and select
Properties
Click the Plus button and search for Eclipse
Select Eclipse and click the Add button then click
Close
You can now use the Panel to start Eclipse. To start Firefox simply click the earth
button in the center of the Panel.

Click the Eclipse button on the Panel to start Eclipse. Be
patient. The first time you click the button it might take a while before the
splash screen is shown.
Select a
workspace to start Eclipse. We are now
going to install Team Explorer Everywhere so we can connect to Visual Studio
Online.
From the help menu select Install New Software…
Click Add…
Name: TFS Plugin for Eclipse
Location: http://dl.microsoft.com/eclipse/tfs
Click OK
Select Team Explorer Everywhere
Click Next >
Click Next >
Accept the Microsoft Software License Terms
Click Finish
Restart Eclipse when prompted
Close the Welcome page
Select Window / Open Perspective / Other…
Select Team Foundation Server Exploring
Click OK
Click Connect to Team Foundation Server and
follow the instructions to connect