Goal
I want to run a Microsoft Test Manager Suite after my bits are deployed by Microsoft Release Management (InRelease).
Solution:
There appears to be a bug in the current "MTM Automated Tests Manager" tool that will fail if your build definition name contains spaces. So I took this opportunity to write my own PowerShell script to run as part of my deployment within Release Management.
Attached to this post is a PowerShell script that corrects the space issue. The remainder of this post will explain how to add a new tool to Release Management and add a testing component to your release template.
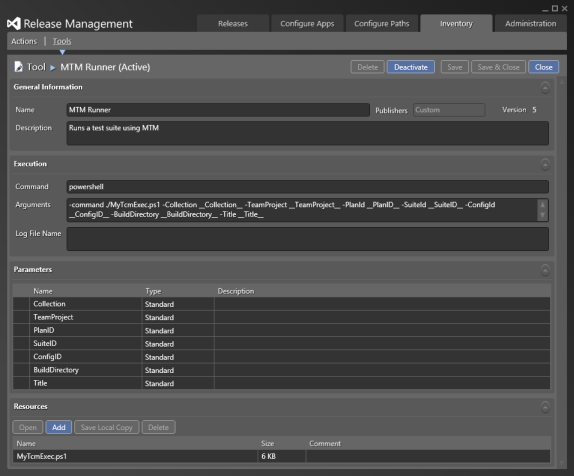
Begin by starting Release Management and clicking the Inventory tab then Tools. Once on the Tools tab under Inventory click the New button. Feel free to enter any Name and Description you like. For the command simply type “powershell”. For the Arguments value enter:
-command ./MyTcmExec.ps1 -Collection __Collection__ -TeamProject __TeamProject__ -PlanId __PlanID__ -SuiteId __SuiteID__ -ConfigId __ConfigID__ -BuildDirectory __BuildDirectory__ -Title __Title__
If you took the time to read the MyTcmExec.ps1 file you may have noticed not all the parameters are listed in the arguments above. That is because not all of the arguments are required to have a successful test run. However, if you need to pass in the additional parameters for your situation simply add them to the Arguments. Each value that begins and ends with double underscore “__” will be assignable on each stage.
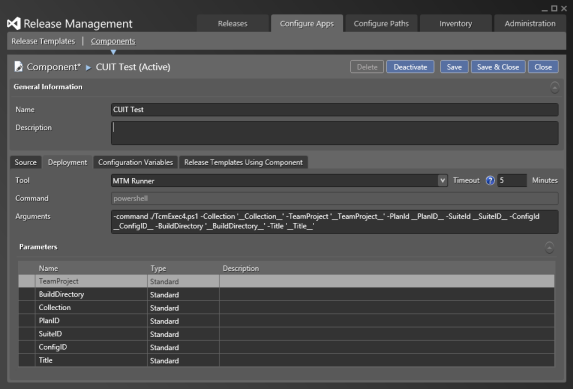
Now that we have our tool in Release Management lets create a component that uses our tool. Click the Configure Apps tab then Components. Once on the Components tab under Configure Apps click the New button. Feel free to enter any Name and Description you like. On the Source tab simply enter a \ for the Path to package value. On the Deployment tab is where we select our tool from the Tool dropdown. Unless you would like to adjust the arguments for this component simply click Save & Close. Note that any changes to the arguments will only affect this component and not the tool definition.
The final step is to add the component to our release template. Click the Release Template tab under Configure Apps. Right click on Components in the Toolbox and select Add from the context menu. Select the desired component and click the Link button or simply just double click the component to add it to the toolbox. Now simply drag and drop the new component to the desired location in your stage’s workflow.
Although Release Management has helper variables for example $(PackageLocation), $(TfsUrlWithCollection) and $(TeamProject). I discovered the $(TfsUrlWithCollection) and $(TeamProject) variables do not expand to the expected values. $(TfsUrlWithCollection) includes the team project and $(TeamProject) expands to an empty string. Therefore, I suggest you simply hardcode those values with the exception of $(PackageLocation) which appears to work as expected.
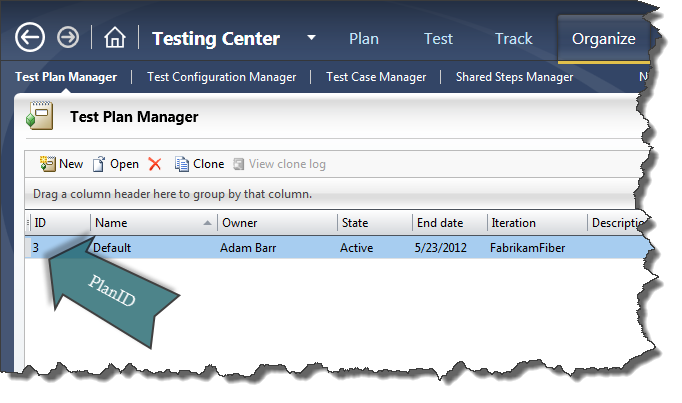
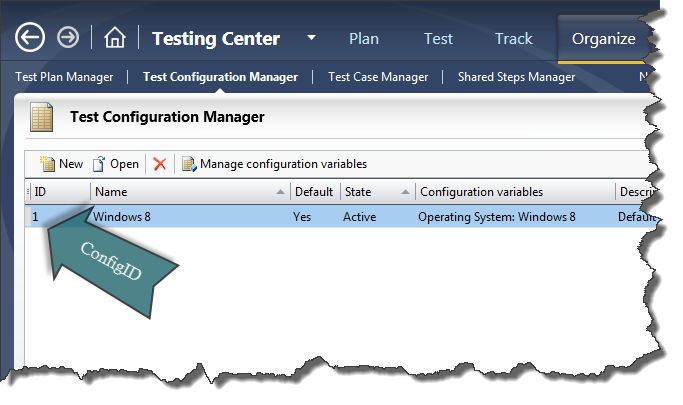
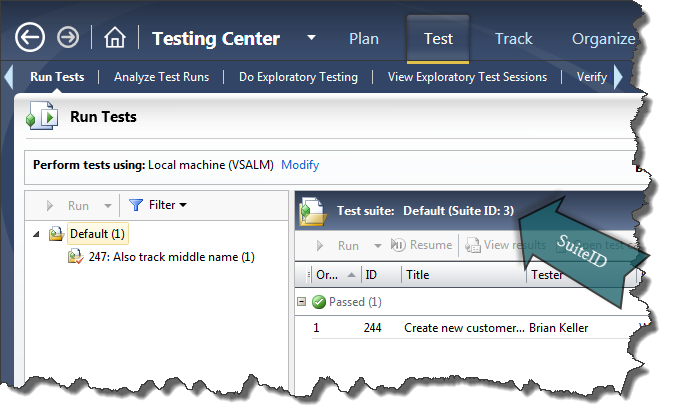
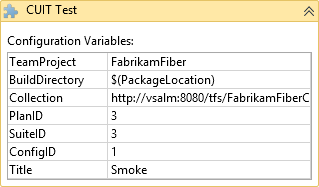
You will have to harvest the PlanID, ConfigID and SuiteID from Microsoft Test manager. Use the images below to locate those values.
You will also need the URL to the Team Project Collection and the name of the Team Project.
Using the values from Microsoft Test Manager and TFS you can now fill in the values of your component. You can enter any value you like for the Title. For the BuildDirectory enter $(PackageLocation).
The final step is to make sure you have associated automation to test case in your selected suite and the assembly that contains that automation is being built with the solution being released.
Good luck.
MyTcmExec.ps1 (6.17 kb)