Problem
My solution contains a .vdproj and it is not supported by MSBuild.
Solution
Call devenv from team build using InvokeProcess for .vdproj projects.
Explanation
This customization can be extended to build any project types not supported by MSBuild (vb6, power builder, fortran, VC++ 6, etc). Any project that can be built from the command line can also be built using TFS 2010 Build using this technique.
We are simply going to add a switch statement that uses the extension of the project to determine if we pass it to MSBuild or perform the build ourselves. Let’s start by opening DefaultTemplate.xaml from the BuildProcessTemplates folder. To begin we must locate the correct area of the build template to add our switch statement. I find the quickest way to do this is to click the Collapse All button at the top of the workflow designer window. Now double click on the words Double-click to vew on all of the following activities:
1. Run On Agent
2. Try Compile, Test, and Associate Changesets and Work Items
3. Sequence
4. Compile, Test, and Associate Changesets and Work Items
5. Try Compile and Test
6. Compile and Test
7. For Each Configuration in BuildSettings.PlatformConfigurations
8. Compile and Test for Configuration
9. If BuildSettings.HasProjectsToBuild
10. For Each Project in BuildSettings.ProjectsToBuild
11. Try to Compile the Project
12. Compile the Project
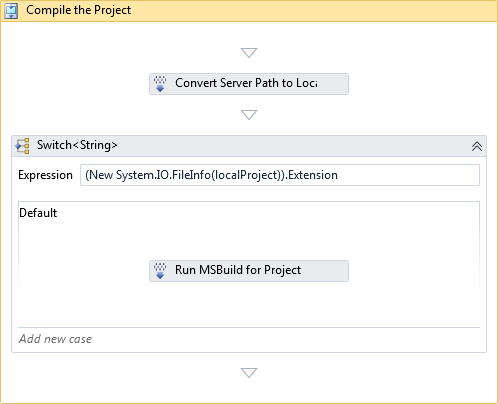
The Compile the Project Sequence contains the Convert Server Path to Local Path and Run MSBuild for Project activities. We are going to add our switch around Run MSBuild for Project. In the toolbox expand the Control Flow tab and drag and drop the Switch<T> activity right above the Run MSBuild for Project activity. When prompted for type, select String and click OK.
Our switch is going to test the extension of the current project being built. If the extension is .vdproj we are going to call devenv ourselves to build the setup project. If the extension is anything else we are going to simply let MSBuild build it. So the first thing we need to do is find the extension of the project being built. The Convert Server Path to Local Path activity stores the project path in localProject which we can use to find the extension. Click the double down arrows in the title bar of the Switch<String> activity to show the expression and cases of the switch. In the Expression text box enter the following:
(New System.IO.FileInfo(localProject)).Extension.ToLower()
This line of code uses an instance of the FileInfo class to gain access to the extension of the current project being built. We call ToLower to make sure the case of the extension is known for our comparison.
Now click the word Default to display the activity area of that case. Drag the Run MSBuild for Project into the default case.
At this point the template works exactly as it did before we touched it. After our customizations you will still be able use this template for all your current builds that use the default template.
Now it is time to add the case for the .vdproj projects. Click the words Add new case. In the Case Value combo box type .vdproj without ”’s. The switch already knows that what you are going to type is a string so you DONOT type the “’s. If you do it will fail because “.vdproj” is not equal to .vdproj.
From the toolbox drag and drop a Sequence activity from the Control Flow tab onto the .vdproj case. Change the display of this sequence to Build Setup Project. We add a sequence here so that we can use multiple activities. Click the double down arrows in the title bar of the sequence to show it's contents. This is where we are going to add the activities needed to build the setup projects.
Before we can add the InvokeProcess activity to build the setup projects we first need to know the command line. Below is an example of the command line to build a setup project. Notice we must provide the configuration to build
"C:\Program Files\Microsoft Visual Studio 10.0\Common7\IDE\devenv" "C:\Builds\1\Build Sandbox\HelloWorld\Sources\HelloWorld\Setup\Setup.vdproj" /build Release
Now we can add the InvokeProcess activity and set the properties to build this command line during the build. To get started simply drag and drop the InvokeProcess activity from the Team Foundation Build Activities tab into the Build Setup Project sequence. With the InvokeProcess activity selected set the following values in the properties window:
• Arguments - """" + localProject + """ /build " + platformConfiguration.Configuration
• FileName - """C:\Program Files\Microsoft Visual Studio 10.0\Common7\IDE\devenv"""
The rest of the values can remain with their default values. Pay close attention to the number of “’s and white space. Because localProject may contain spaces we must quote the string. The same is true for the path to devenv.exe.

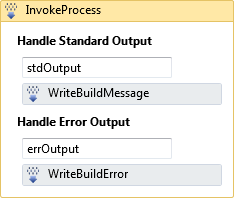
Whenever I use an InvokeProcess activity I always expand it and add a WriteBuildMessage under Handle Standard Output with the Message set to stdOutput and a WriteBuildError under Handle Error Output with the Message set to errOutput. This will allow that information to be show in the build output.
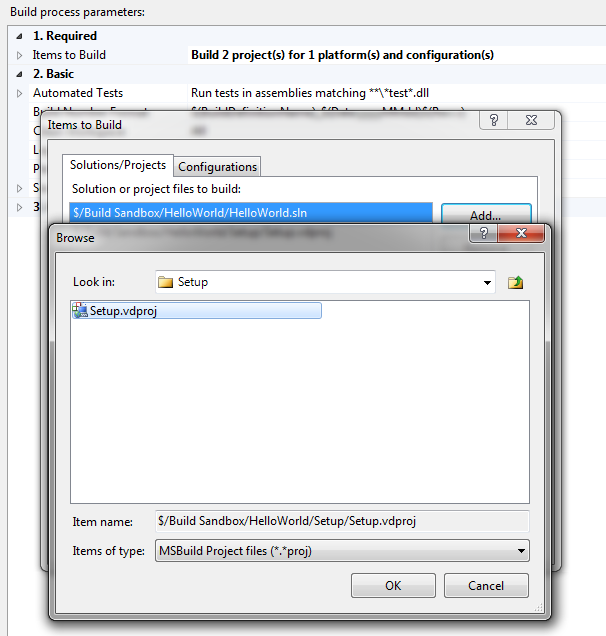
At this point if we check in our changes and add our .vdproj file as an Items to Build from the Process tab of the build definition the setup project will be built. Be sure and remove the .vdproj project from the solution or you will continue to get errors from MSBuild.
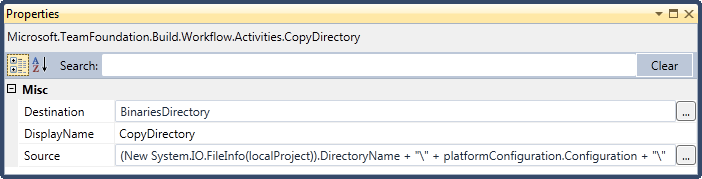
However, it will not be in our drop location. The reason for this is because only items that are in the binaries folder get copied to the drop location. The final piece is to add a CopyDirectory activity under the InvokeProcess to copy the contents of the output folder of the setup project to the binaries folder. With the CopyDirectory activity selected set the following values in the properties window:
• Destination - BinariesDirectory
• Source - (New System.IO.FileInfo(localProject)).DirectoryName + "\" + platformConfiguration.Configuration + "\"
Your Build Setup Project sequence should look like this:

Now save your xaml file, check in your changes and queue a new build.
You can download a copy of the final file below.
TFS2010 DefaultTemplate.xaml (59.14 kb)
TFS2012 DefaultTemplate.11.1.xaml (81.14 kb)