This is a neat post because we are going to be using all three Azure offerings SaaS, PaaS and IaaS. Let me set the stage. My goal is to deploy using Release Management Online (SaaS) to an Azure Web Site (PaaS) via an Azure Virtual Machine (IaaS) from code in Visual Studio Online (SaaS).
First let's create the Azure Virtual Machine we are going to use to actually move the bits. You will see why this is necessary as we progress. Please note this machine could live anywhere I just decided to place it in Azure.
When I create virtual machines in Azure I prefer to create the Cloud Service and Storage Account that is going to hold it first so that I can control the names. If you simply use the Virtual Machine wizard it will create a Cloud Service and Storage Account with crazy names. So let’s create our Cloud Service first.
Log into your Azure account at https://manage.windowsazure.com and click the “New” button and select Compute -> Cloud Service -> Quick Create.

Enter in a descriptive name and click Create.
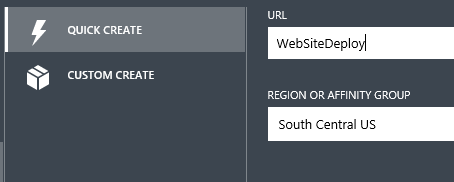
Next we will create the Storage Account. Click the “New” button again and select Data Services -> Storage -> Quick Create. Enter in a descriptive name (I use the same as the Cloud Service name) select the Location and Replication that fits your needs. I selected South Central US (because I live in Texas) and Locally Redundant. Now click “Create Storage Account”.
Now let’s create our Virtual Machine. Click the “New” button again and select Compute -> Virtual Machine -> From Gallery. Select the “Windows Server 2012 R2 Datacenter”. Enter in a descriptive name, leave the size as an A1 and enter in a User Name and Password.
On the Virtual machine configuration page select the Cloud Service and Storage Account we created earlier. Click through the final pages to create the virtual machine. While the machine is being created we can move on to creating the web application we will deploy to an Azure Website.
I am using Visual Studio 2015 Preview. If you are using an older version of Visual Studio make sure you have the latest version of the Azure SDK installed. This will allow us to configure the Azure Website in the New Project dialog in Visual Studio.
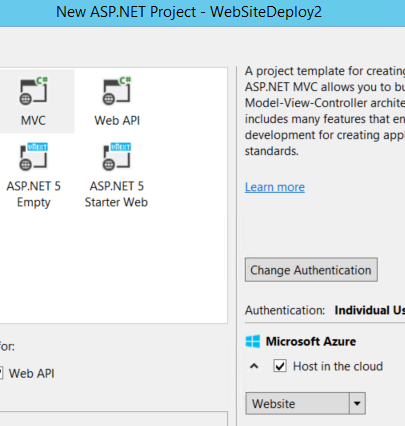
Start Visual Studio and connect to your Visual Studio Online account with Team Explorer. Now create a new ASP.NET Web Application and make sure you check the box to “Add to source control”. On the “New ASP.NET Project” page make sure the “Host in the cloud” check box is checked and “Website” is selected.
On the “Configure Microsoft Azure Website” dialog enter a Site name and select “Create new server” for the Database server. Enter a database username and password then click OK.
We need to add a PowerShell file to our new project that will be used by Release Management to deploy our project. We will store the file in a new folder called “Configuration”. To the new “Configuration” folder add a text file named “publish.ps1”. Right click on the “publish.ps1” file in Solution Explorer and select Properties. Change the “Copy to Output Directory” to “Copy Always”. Now type the following command into the file replacing the [] values with your values:
Publish-AzureWebsiteProject -Name [AzureWebsiteName]
-Package $applicationPath\_PublishedWebsites\[ProjectName]_Package\[ProjectName].zip
Now check in the project.
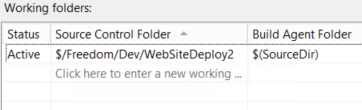
Now we need to configure our build. From Team Explorer create a new “Build Definition”. You should only have a single working folder. The “Source Control Folder” should be the folder that contains your solution file and the “Build Agent Folder” should simply be “$(SourceDir)”. The build controller should be “Hosted Build Controller” and the “Copy build output to the server” should be selected on the “Build Defaults” page.
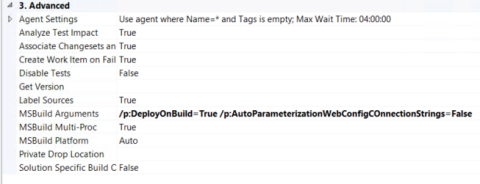
To make sure the deployment package is created correctly so it can be used by Release Management we need to pass additional arguments to MSBuild. In the MSBuild Arguments field enter:
/p:DeployOnBuild=True /p:AutoParameterizationWebConfigCOnnectionStrings=False
Now Save and Queue a new build. While the build is running we can go configure our virtual machine with the Azure PowerShell tools.
Connect to the Virtual Machine we created earlier. Download and install the Azure PowerShell and Web Deploy 3.5 tools from here. There is a great write up on how to set up the Azure PowerShell tools here. Once you connect your subscription you can log off the machine.
You will have to have the Release Management Client Update 4 installed on a machine and connected to your Visual Studio Online account.
We now have to connect Release Management to your Azure Account. From the Administration tab click on “Manage Azure”. Click the New button to open the “New Azure Subscription” page. Use any name you like. You can locate your “Subscription ID” from the Azure Management Portal. From the Azure Management Portal select “Settings”. The settings page list all your Subscriptions with their Subscription ID’s. Just copy and paste the GUID into Release Management. Next you will need to get your “Management Certificate Key” from https://manage.windowsazure.com/publishsettings. Just save the file to somewhere safe and open it with a text editor. Copy the ManagementCertificate value without the quotes and paste into Release Management. Finally you need to provide a Storage Account Release Management will use to move files to Azure. You can use the same Storage Account we created to hold our virtual machine.
With your Azure account configured in Release Management we can now create our Environment. Click the “New vNext Azure” button on the Environments tab under “Configure Paths”. Then click “Link Azure Environment”. Select your subscription and select the storage account we created and click Link. Now click "Link Azure Servers", select our virtual machine and click Link. You can now Save & Close the Environment.
Next we have to create the “vNext Release Path” using our new environment. Using the environment we just created add as many stages as you need. This machine is really playing the role of a proxy. The bits of our build will be copied there and the PowerShell we be executed from that machine. The PowerShell will publish our application to the Azure Website.
Next we need to define a component. From the “Configure Apps” tab select “Components”. Click “New vNext” and give it a name and set the “Path to package” to “\”. Now Save & Close.
The final step is creating a “vNext Release Template”. Click “New” from the “vNext Release Templates” page. Give it a name, select the release path we just created and set the build definition to the correct build then click Create. Right click on Components in the Toolbox and click Add. Link the component to the Release Template. Now drag the “Deploy Using PS/DSC” to the Deployment Sequence. Select the server name from the dropdown. Enter the username you selected when you created the virtual machine in .\UserName format. Enter the password, select the component, set PSScriptPath to “Configuration\publish.ps1” and set SkipCaCheck to “True”. Now click Save and then “New Release”. Use the latest build and select Start.
You application will now be deployed to your Azure Website.